


The Terminal application and commands are important tools for beginners in programming to start getting familiar with.
The Terminal command line helps in handling the server - sort of like a short cut to access and manipulate your computer’s server, files and folders.
Once you understand terminal commands and know their function, it will be help you manage repetitive tasks all while saving you time as you work on your projects.
Accessing the terminal
To access the terminal application on a PC with Ubuntu OS, use ctrl + Alt +T. Alternatively you can search ‘Terminal’ from the top left section of your screen labeled ‘Activities’
For Mac users, the terminal application is located in the utilities folder, within the applications folder. You can also use the finder or spotlight tool to search the Terminal application.
Command prompt and command line
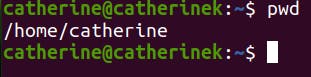
When you open the Terminal application, the first thing you’ll see is a blank screen with a name and a dollar sign ‘$’ next to it. This is called a prompt and it simply prompts you to input something. What you type after the dollar sign is the command line. A command line is a program that takes in requests, and passes on to the computer’s operating System to run. For example, the prompt on my computer looks like this:

For the image example above:
- catherine is the name of the users who’s currently logged in the the computer
- catherinek is the nickname you gave for the computer
- ~ indicates you’re located in the Home directory. The Home directory is the folder that contains all your files, folders and applications
- $ is the end of the prompt
It’s important to note that command prompts look different depending on which Operating System you use.
Interacting with the Command Line
Here are the frequently used Terminal commands which you will use frequently in your programming journey. Take note that these commands are based on Ubuntu OS.
Finding out current location
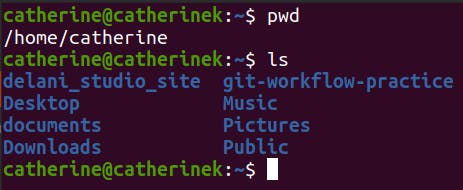
To see where you're currently located in your computer, type the command pwd which stands for ‘print work directory.’ i.e. the current directory/folder you're working in. Once you hit enter or return, a file path is displayed and as shown in the image below, we’re currently located inside catherine’s folder that's within the home directory/folder:
View contents of a folder
To see what items are within a folder, type ls which stands for ‘list’. This command lists all the files and folders within the Home directory to the command line:

Creating a folder
mkdir is the command used to create folders and it stands for ‘make directory’ i.e. make a new folder. To give the folder a name, type mkdir + any name you choose. In this case, we can make a new folder called Hashnode. Once done, type ls to see if the folder has been created. Notice that once you type mkdir + name of folder and hit enter, the command line moves to the next prompt. Always list to see the new folder, in case you're not sure.
Moving into a folder
Once you create the new folder, move into it by typing the cd command + name of the folder you want to move into. cd stands for ‘change directory i.e change folder. When you hit return, this is the result:

Notice that the name before the dollar sign has changed, indicating we have changed our location to the Hashnode folder.
Creating a file
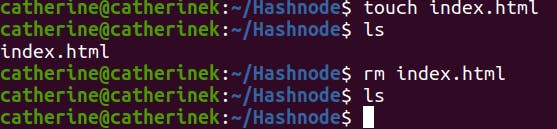
Now that we have a new folder, let’s create a file within the Hashnode folder. You do this by typing the touch command. This works the same way as mkdir only that now, the touch command creates a file instead of a folder. For this case, we want to create a HTML file, so we type the command + name of file i.e. ‘touch index.html’. As shown below, the file has been created within the Hashnode folder. Please note that when choosing files names with more than one word, always use the dash symbol between the words. Failure to do so will create 2 or more files instead of one file:

Opening files and folders into text editors
If you’re using Atom or Visual Studio Code, here’s how to open files and folders using the Terminal. For Visual Studio Code, type ‘code .’ and for Atom, type ‘atom .’:

Deleting files and folders
To delete a file within a folder, simply type the command rm + file name. rm stands for ‘remove’. . Once deleted, type command ls and you’ll see that, indeed, the file has been deleted and nothing will show when you hit enter/return:
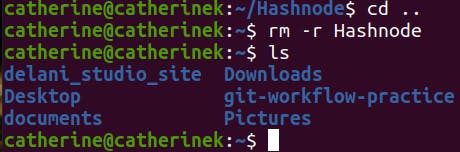
To delete the folder and everything in it, rm -r + folder name is the command to use, but you first have to move one folder up because you cannot delete a folder while still in it. To do this, type cd .. followed by rm -r. As you can see, the folder is not showing when you list, indicating that it’s been deleted.
Clear Terminal screen
Finally, to clear your terminal’s screen, type the clear command. All that remains is the command prompt - but no worries! All your files and folders are still intact.
As you continue learning and building projects, you will come across more commands and an easy Google search will help in understanding their functions. To learn more commands, check out this resource from how to geek Important linux commands you should know .
Happy coding!